
Girl, Let’s Talk About Your Gut
Do you ever experience bloating; constipation, indigestion, gas, an upset stomach, or you are running to the bathroom during a really big dinner party because your IBS (irritable bowel syndrome) shows up unexpectedly? I hear you ladies. I know ALL of this far too well.
Oh, and by the way, my name is Christina and I am a Registered Holistic Nutritionist. Now that we are on a first name basis and you know all about my digestive health, I want you to know that you are not alone and there is hope!

@eatsbytee
Let me tell you a little bit about my digestive health journey. Take a seat because we will be here for a good minute. It started back when I was 8-years-old when I was diagnosed and medicated for anxiety. A few years down the road I started to experience all different kinds of digestive issues, which later on I found out that anxiety is commonly linked to irritable bowel syndrome. I was always in and out of the doctor's office and being referred to many different specialists over a 12-year period – how exhausting! The funny thing is I was eating McDonald's, Wagon Wheels, Dunkroos, pizza, pasta, etc. and wasn't advised until the age of 22 that maybe I should go see a nutritional specialist (that's over 10 years of trying to figure out my digestive issues!!!). Instead, I became the girl obsessed with antacids and a heating pack every single night because sometimes the bloating got so bad that I couldn't even move. Oh and running to the bathroom at really nice dinner parties was the cherry on top of every evening out... ugh
Finally after many frustrating years of bloating, IBS, anxiety, fatigue, and whatever other symptoms I had, I finally decided that it was time for me to take my own health into my hands. I decided to go the alternative route in 2014 because that's what worked best for me. Continuing to make small changes to my diet, lifestyle, and even taking additional supplements, I finally started to see relief. I decided to go to school as a Holistic Nutritionist so I can guide a group of people who may be going through the same health concerns I had. So here I am, ready to talk about some very simple and important ways on how to support your gut and maybe lead you one step further on your health journey.
Below I have provided you with tips and tricks that I use with all of the clients I meet with gut health issues. I hope that this helps you out if you experience any digestive issues and are at a loss of what to do. You are not alone my friend, I know exactly what you are going through and I want you to know that by focusing on small steps at a time, your gut will be feeling happy and healthy again. First, let me quickly educate you on your gut microbiome.
WHAT IS YOUR GUT MICROBIOME?
Your gut microbiome is made up of the trillions of microorganisms and their genetic material that lives in your intestinal tract. These microorganisms, mainly comprising bacteria, are involved in functions critical to your health and wellbeing. These bacteria live in your digestive system and they play a key role in digesting the food you eat, and they help with absorbing and synthesizing nutrients too.
1) PROBIOTICS AND PREBIOTICS
Both probiotics and prebiotics work together as a team. Probiotics are living organisms in the gut that are essential for creating friendly bacteria. If you have been on any antibiotics in the last 5 years then being on a probiotic is ideal. Prebiotics are important because they help feed the friendly bacteria and promote its growth. You can think of prebiotics as a food source for probiotics.
My favorite probiotic supplement is the Genuine Health Advanced Gut Health 15 billion Probiotic (https://www.genuinehealth.com/en-ca/products/gut-health-probiotics/) the best sources of probiotic foods are fermented foods.
Prebiotic food sources are dandelion greens, chicory root, garlic, onions, leeks, asparagus, bananas, oats, apples, and barley.

2) FERMENTED FOODS
As discussed earlier, fermented foods are a great source of probiotic foods that will create friendly bacteria in the gut. This will help eliminate bad bacteria in the gut and create a friendly environment for good bacteria to live. Probiotics enhance mineral absorption, break down bile, and strengthen the immune system. The best sources of fermented foods are yogurt, kefir, kombucha, miso, sauerkraut, tempeh, kimchi, and some cheeses. You can always buy these at the closest health food store or make your own with the recipe I provided below J
3) BONE BROTH
Bone broth is like liquid gold when it comes to healing your digestive tract. It is so tasty and full of beneficial nutrients that will help give your gut the proper nourishment it needs. It contains amino acids such as proline, glycine, and glutamine that help repair the gut lining. Bone broth is rich in collagen, which will help soothe the intestinal lining and creates connective tissue to protect our bones and joints and maintain healthy skin, hair, and nails. You can make it yourself, or buy in the store. I recommend drinking 1-2 cups daily to fully reap the benefits.
4) REMOVE ANY OFFENDING FOODS AND LISTEN TO YOUR BODY
Removing offending foods is the first step. These are any foods that you are allergic to or sensitive to. This causes damage in the gut and over time can increase intestinal permeability such as leaky gut. The best advice I have is to listen to your body and note which foods may be triggering these symptoms. Buy a food journal and write down the foods you are eating and the symptoms you are experiencing. Eventually, you will know exactly which foods upset your digestive tract.
5) REDUCE INFLAMMATORY FOODS
Your microbiome regulates inflammation and immunity throughout your entire body. These foods are best to be avoided because it can inflame the gut lining and cause many digestive upsets. Inflammatory foods I suggest avoiding are sugar, alcohol, processed foods, dairy, and gluten.
6) FOCUS ON WHOLE FOODS
Eating whole foods with nutrient-dense properties is one of the most important tips when healing your gut. Eat plenty of fresh fruits and vegetables, dark leafy greens, easy-to-digest grains (gluten-free oats, quinoa, millet, and amaranth), and healthy fats like avocado, flax, hemp, pumpkin seeds, almonds, raw coconut, and walnuts. These foods will help reduce inflammation and support gut health.
7) START YOUR DAY WITH WARM WATER AND LEMON
Before any consumption of coffee, tea, or food I suggest starting your day with a warm mug of warm water with lemon juice. This is great for regulating your metabolism and will help eliminate the build up in the gut. It will also provide great nutrients to keep the liver running smoothly. After all, your liver is one of the main detoxifying systems in your body.
8) TAKE 1 TBSP OF ACV BEFORE MEALS
Organic Apple Cider Vinegar will help create hydrochloric acid in the stomach, which will break down foods and avoid upsetting digestive symptoms you may be experiencing. The combination of the ACV and lemon will activate enzymes in your stomach, which will allow the proper breakdown and distribution of foods (better for nutrient absorption). ACV will also open up detox pathways, which will help support the liver and regulation of bowel movements.
9) CHEW YOUR FOOD AND PRACTICE BREATHING TECHNIQUES BEFORE MEALS
Deep breathing is VERY important and I suggest practicing this throughout the day – especially before meals to relax the digestive tract and allow the proper breakdown of foods. Chewing food longer will also be beneficial in breaking down your foods and proper distribution of your nutrients. Chewing is the first step in the digestive process as it sends a message to the stomach to get the stomach acid ready and to the pancreas to send enzymes to the small intestine. Chewing until the food is liquefied before swallowing gives your digestive enzymes a chance to access all the nutrition locked up in the food you're eating.
10) PRACTICE STRESS MANAGEMENT AND DEVELOP A GOOD SLEEPING PATTERN
Digesting food requires a parasympathetic nervous system response. Balancing the parasympathetic system decreases stress levels. Emotional stress can trigger digestive upsets and cause an inflammatory response in the gut. Stress decreases nutrient absorption and decreases the blood flow to digestive organs. I suggest practicing stress management tips such as yoga, meditation, breathing techniques, being in nature, walks, listening to music, journaling, and finding a sleep routine. Sleep is important as it allows the digestive system to repair and rest. Creating a good sleeping routine is a great way to allow your gut to restore.
11) WORK WITH A NUTRITIONIST
Working with a nutritionist is great for long-term benefits. I work with many clients who have gut health and mental health concerns and I guide them along their health journey. It is important to have someone there to check in on you and make sure that you are making improvements. Nutritionists create a safe space for you to ask questions and share any health concerns you may have. As a holistic nutritionist, I take a mind, body, and spirit approach and dive deeper on these issues. If you have benefits to see a dietician-nutritionist or a holistic nutritionist I know so many wonderful ladies (including myself) who would love to help.
Fermented foods recipe:
1-2 cups sliced vegetables (cabbage, carrots, broccoli, cucumber, cauliflower, radishes, etc.
2 cups water (room temperature)
1 ½ tbsp. sea salt
Spices and herbs (pepper, dill, thyme, rosemary, whatever flavor you like)
1 Mason jar with lid
Cut vegetables of choice and add to a small-medium sized mason jar with herbs and spices. Combine water and salt in a cup and mix together. Add salt water to mason jar until filled. Top Mason jar with a lid and shake well.
Store in a cool dry place for 4-10 days while vegetable begins to ferment. Consume fermented vegetables 1-2 x daily.

Christina Anania
Registered Holistic Nutritionist

STUCK IN A RUT? TIPS + TRICKS
Hi Gang!

When was the last time you found yourself in a rut, an emotional downward spiral, or a period of your life where you felt uninspired or just plain unhappy?
Whether it’s caused by a breakup, difficult times with friends, losing a job, struggles at school, or just straight up being unhappy, these seasons of life are something we all go through, and often times they’re the most difficult to talk about. We’re embarrassed, confused, frustrated, and don’t exactly know how to voice our feelings or explain what exactly it is we’re going through.
For the majority of my life, I’ve gone through the motions of doing everything I thought I was supposed to be doing. I graduated high school, went to university, and immediately started working in the corporate world. I moved up at each job I went to and always felt like I had great relationships with my coworkers and bosses.
In the summer of last year, I started a new job that I was really excited about. I thought this would be an opportunity for me to be happy at the same company for a while, and couldn’t wait to see the potential of where the new role could take me.
Unfortunately, this wasn’t the case.
A week before my probation period ended, I was let go from my position. The worst part about it, long story short, was that I was given no explanation why. I had never felt this kind of rejection in my career, and I was angry, confused, and hurt. I was in a complete state of shock and all I could think was, “Did that really just happen?” and “What did I do wrong?”
Of course, that night I drowned my emotions in carbs, wine, and scotch. However, a big part of me thought “I’m not going to let this get me down!” and I immediately tried to push my emotions aside and get to work on what I was going to do next. I maintained this mentality for about a week before I completely broke down. I was emotionally exhausted, overwhelmed, and to be completely honest, I was just sad.
While I did try to stay busy and positive, I had a hard time pulling myself out of this rut. I woke up every day feeling lost, emotional, and discouraged. My self- esteem had taken a serious kick to the gut, and I struggled to build it back up. My boyfriend and I ended up going on a vacation, the holidays came and went, and then we arrived in the New Year. During this time I really thought about my life, what I wanted out of it, and what I should do next to try and get myself feeling motivated again.
Here are some of the steps I went through in order to get through this difficult time in my life; and while I feel like I’ve made significant progress, it’s still something I’m learning how to navigate on the daily. Regardless of what the situation you’re in is, from losing a job to going through something difficult with a friend, these steps can hopefully help you clear your mind and get you back onto the right track.
Don’t be too hard on yourself
In my experience when you’re going through a hard time it’s always easiest to turn and blame yourself.
Why did I let this happen?
What could I have done better?
The list goes on and on. The reality of the situation is a lot of the time the things we’re going through we have little or no control over. Allow yourself this time to reflect on the situation you’re going through without tearing yourself down immediately.
I get it, this can be easier said than done, but reminding yourself of the qualities you love about yourself daily, the things and people in your life that you’re grateful for, and setting goals is a great place to start! I keep a journal that I write in every morning to mind dump all of my crazy thoughts, write down goals, and things I’m grateful for.
Don’t be afraid to ask for help
Right when I let go from my job I immediately felt an extreme amount of embarrassment. I didn’t want to tell my friends or family, I started to dread going to family dinners because I was worried someone would ask about my job, I’d sometimes just start crying (and tbh still do) if a friend asked how interviewing was going. I wanted everyone to think I was doing fine and didn’t need any support.
This is still something I’m struggling with three months later. It’s okay to ask for help from your loved ones, but it’s also okay to set boundaries.
If you’re feeling overwhelmed or insecure and need to talk to a friend or family member, try to remember that you aren’t inconveniencing them with your feelings. They’re there to help and support you. If you aren’t ready to confide in someone in your personal life, seek out the help of a therapist or trained professional. Talking to someone about how you’re feeling is a great first step in trying to move forward.
Or if you simply just do not want to talk about it anymore, TELL. PEOPLE. THAT. This is something I also struggled with because I didn’t want my friends or family to think I was ungrateful that they were concerned for me and cared. But, I got to a point where this was hurting me more then helping and I needed to set that boundary.
Don’t ignore your feelings, but don’t let them take over
Allow yourself to take a breath and actually process how you’re feeling. Rushing onto the next boyfriend, girlfriend, job, friend, whatever it may be without actually going through the motions of how your feeling, in my opinion, is setting yourself up to potentially fail.
Once you’ve taken a little bit of time (and by a little bit of time I mean a week or less) to binge watch Housewives and eat cheesy carbs, it’s time to get back out there. Some ideas could be to start making to-do lists every Sunday night to keep yourself busy, write down companies or businesses you’d be interested in working with, make a list of things in your life that you want to change, join a new gym, sign up for a class that will enhance your career or brand, rearrange your living room furniture, organize a GNO (girls night out), or, do it all!
Not every day is going to be perfect while you’re going through this; but focusing on the things that make you feel happy, productive, and motivated is a start! Remind yourself daily what a kick-ass person you are, and it will help you move in the right direction out of your rut.
Remember…
We all go through these periods of feeling stuck. Remember, you aren’t alone, and you have the power and ability to change the course of your life. I hope these tips and tricks can help you the way they’ve helped me!

@blondeseyeviewblog

LET'S CARE ABOUT OUR SKIN CARE
Mornings can be tough, but let’s give a sh*t about our morning skin care routine!

Don’t you want a basic skin care routine that will save your skin from aging and blemishes? When it comes to skincare, keep it simple and small. You don’t need 15 products to create a flawless glowing skin. Here are my favourite products that are effective, long lasting and result driven.
FIRST: A morning routine should consist of either a cleanser or exfoliating toner. If you have oily skin and sweat at night, I highly recommend using a gentle cleanser. Your cleanser shouldn’t leave you feeling tight and dehydrated. IS Clinical Cleansing Complex is hands down the best cleanser I have ever used. You only need a dime sized amount. Those of you with dry skin should invest in an exfoliating toner such as Ole Henrickson Oil Control Balancing Force. Apply it using a cotton round. It will help remove any debris and ensure makeup application is smooth.
SECOND: Apply a vitamin C serum as it strengthens the skin and fights free radicals (sun, environmental, pollution). Lock everything in with your favourite moisturizer, find something for YOUR skin type. IS Clinical has 2 of my favourite, Moisturizing Complex and Reparative Emulsion. And, yes, eat your fruits and veggies too - that helps optimize skin health.
THIRD: The final step often gets neglected, but it is the SINGLE MOST important one. Applying a sunscreen! SPF is my number 1 recommendation for all ages, especially those of you in your 20’s! Treat it as a serum - find something that works for you and that you like. And no, SPF 15 in your foundation does not count! If you want SPF in makeup, I suggest a tinted moisturizer with an SPF between 30-50. IT Cosmetics CC cream and Bare Minerals Complexion Rescue are some great choices.
My favourite time of the day has to be my night time skin care routine. It’s a great time to unwind and relax. Details coming up in the next post, so stay tuned.

Clinical Products: http://www.myuzartistry.com/shop
Toner: en/product/balancing-force-oil-control-toner-P416816?icid2=products%20grid:p416816:product
You can purchase IS Clinical products from the Myuz website or in person at Blush and Blonde.
3 SIMPLE TIPS TO LOOSEN YOUR HIPS

@laurentoews.rmt –
Registered Massage Therapist
Booty, buttocks, bum, keister, badunkadunk, derriere – whatever you call it, you’ve got one (and if you’re in TFGG, it’s likely a nice one, AM I RIGHT?!). Your glutes are responsible for so many of your daily actions like bringing your leg back into extension, rotating your foot/hip outwards, rotating your foot/hips inwards, and bringing your leg up and out to the side. They also contribute significantly to low back, hip, and leg tension. If you’re like a large portion of the general public, you’re probably thinking “my butt doesn’t hurt, it isn’t tight” - but you would most likely be wrong. That’s why I’m here! To help you understand why you might have been targeting all the wrong spots in your rehab in the past, and how to make simple changes going forward!
Fun fact: the body does a fantastic job at diverting your attention away from the actual cause of your pain, rather than pointing it out clearly to you. My very first anatomy teacher gave our class this simple analogy – when a crime is committed, who reports it? Does the person who DID the crime call it in, or are the people who are AFFECTED by the crime going to report? Exactly. The muscle that is causing the problem doesn’t typically give itself away, so when you feel a pull or pain in one area it’s important to remember that it is usually just the symptom rather than the root cause. Just like feeling tension in your low back typically points to glute tension, a feeling of tension in your hamstrings is almost always the result of tight quads/hip flexors.
I’m going to throw another analogy at you, so bear with me. Imagine your body is a seesaw, with a base in the center and a seat on either side; your skeleton is the base of the seesaw, the muscles on the front of your body are the seat on one side and the muscles on the back side of your body are the other seat. Ideally, your body wants all muscles to be of equal length/pull, which is a principle called Tensegrity (another topic for another time), which would cause the seesaw seats to be equal to one another in height. Are you still with me? Great. Now if one side of the seesaw goes up, the other side must go down. This is the same with your muscle lengths. If the muscles on one side of your body get shortened and “tight” the opposite side muscles must lengthen. While lengthening might not sound like a bad thing, this is actually the cause of most muscle discomfort. Imagine taking an elastic band and pulling it to its max length – now try to strum that elastic. Words like “snappy” and “taut” come to mind. That’s basically what the majority of the general population has going on with their hamstrings.
So to tie all analogies together, your hamstrings are feeling tight because your quads have shortened (due to daily activities, life postures, structural differences, etc.) causing your hamstrings to OVER lengthen which produces that pulling feeling, increasing your risk of injury/strain since there is no more give in the muscle, and actually reducing your range of motion (this is the exact reason why you may never be able to touch your toes regardless of how often you try and forward stretch to get there). Evil genius, isn’t it? Now if you’re still with me after all of that, you may be saying “Okay, but what do I do about it now that I know where the tension actually is?!”. Good question. Keep reading.
Whether you spend all day at a desk job, studying for school, driving long hours, or devote yourself to multiple day-long Netflix binge sessions in a row (okay, that last one might be just me…), you’ve probably felt the twinge of low back pain from time to time. While there are several more in-depth routes you can take to your rehab, and sometimes more severe concerns that need to be addressed, these tips are designed for the average person who has discomfort but isn’t prepared to do a major lifestyle overhaul just to get some relief (…again, just me?!). If you feel “tight” in your low back, a pinch in your hips, or a pulling sensation down the back of your leg, listen up!
Tip 1: GET MOVING
This one might sound like a given, and you might be thinking “but Lauren, I work 8 hours a day at a desk job with tight deadlines to meet, I can’t be walking a lap every 15 minutes” – I know. And you don’t have to! The truth is that our bodies are meant to move – basic physics tells us that a body in motion stays in motion, a body at rest stays at rest. If we aren’t regularly moving our muscles they shorten up leaving you feeling stiff and achy in places you’d rather not be. The best way to combat this is to switch things up – don’t let your muscles get too comfortable. Everyone knows how to squeeze their butt, and that’s the bare minimum of what I am asking you to do. Yes, ideally you would get up from a seated position at least once an hour to take a quick stroll across your office, or even just your immediate work vicinity so that your legs can get a stretch, but at very least all you need to do is activate your muscles by interrupting the signal they are sending to your brain while in a static position. Do you know how to flex? Good. Do it. Even if you can’t get up from your seated position, I want you to shift your position – rock from side to side, slightly raising one hip at a time. Flex your quads. Flex your glutes (this is the bum squeeze I was talking about). Bend forward in your seat to touch your toes. These tiny movements can make a big difference if you are doing them often enough. Try doing them at least once every hour that you are stuck in a seated position.
Tip 2: STRETCH
If you’ve gone to a manual therapist or personal trainer before you’ve probably been asked the dreaded question – “how often do you stretch”? Truth be told, it’s a bit like the “how often do you floss” question at the dentist. They can tell. So can we. The majority of people don’t stretch enough - but some people really are trying and simply end up focusing on the wrong areas or have poor form that doesn’t reach the right muscles. The most important areas to stretch for low back pain are your quads and your glutes – everyone please stop stretching your hamstrings so much. I repeat, STOP STRETCHING YOUR HAMSTRINGS. Remember that seesaw analogy from before? The vast majority of people with low back pain have shortened quads and hamstrings that are already at their max length – trying to stretch something that is already at its max length is not only useless but it can also damage your muscle if you are pushing the stretch too deeply or aren’t properly warmed up. By all means, once your QUAD muscles are warmed and lengthened you can move onto hamstrings, but please stop wasting your time starting with the hams. You’ll thank me!
So, let’s talk quad’s. This first stretch might seem very simple and I’m sure we’ve all learned it at some point in our life, but if you are someone who has flexibility in your hip you may be missing the stretch altogether. I have a handy trick to make sure you are actually targeting the muscle you want.
QUADRICEP STRETCH
- Stand upright on a sturdy flat surface. If your balance isn’t great, feel free to hold onto the top of a chair, desk, or put a hand up against the wall to steady yourself.
- With the palm of your hand grasping the topside of the foot, bring your foot to your bum. If you’re unable to reach your foot with your hand alone, you can use a belt or towel around your foot to add length to your arm. Do not pull your foot any closer than is comfortable – it is okay to feel a pull in the front of the leg but if you feel pain at the knee stop this stretch.
- Make sure that your knees are as close together as they can be – you don’t want your hip jutting out to the side – and keep a nice tall, straight back.
- This is the step that most people miss, and is arguably the most important. SQUEEZE THAT BOOTY! By activating your glutes, you are forcing your pelvis into slight posterior rotation which helps to add that extra length to the muscle from the top half, rather than just the lower muscle fibers that you are pulling towards the knee.
- With the glute contracted, hold the stretch for 15-30 seconds at a time (or longer if you can handle it). This can be repeated as many times per day as necessary and should be done on both legs even if you are only feeling a pull on one side.

Image by www.barefootphysiotherapy.com.au
Next is the seated piriformis stretch. When your piriformis is tight it can cause pain down the back of the leg, sometimes as far down as behind your knee and into your calves, and is often termed Piriformis Syndrome. This feeling so regularly gets misdiagnosed as a more severe nerve problem called Sciatica. The biggest difference between these conditions is that sciatica is an issue with the sciatic nerve which runs the full length of your leg from your lumbar spine to your big toe and comes from the root of the nerve in your spine – it can be caused by disc herniation, trauma to the vertebrae, or simply irritated from improper posture and is a fairly severe condition causing debilitating pain. Similarly to sciatica, when you have tight glutes/piriformis, the muscle can also compress the sciatic nerve to some degree which causes that same irritation down the back of the leg. The tension is often described as an extreme pulling sensation, or even like putting your hamstrings or calf muscles into a vice grip – not comfortable, but a hell of a lot easier to fix! This stretch is a great one because it is simple, extremely effective at easing that pulling pain immediately, and can be done from the comfort of your seat. Therapists typically call it a “Figure 4” or “Tailor Stretch”, but it goes by many names and has many variations. This is my favorite version because it is the easiest to incorporate into your daily life with minimal disruption to your activities.
PIRIFORMIS STRETCH
- Sit on the edge of a firm surface like a chair or bench.
- Bring your ankle up to lay on the knee of your opposite leg.
- Lightly apply downward pressure to the knee of the crossed leg.
- Keep your back straight, and slowly start to lean forward – you aren’t trying to bend over your lap so make sure to keep your head up and back straight. You should feel a pull on the outside edge of your leg and hip, and into your bum. You may feel a dull achy sensation which is completely okay. Ideally hold this position for 30 seconds, but any amount of time is better than none.
- Repeat on both sides, and as often as needed.

Image by www.wikihow.fitness/Do-a-Seated-Figure-Four
Tip 3: RELEASE
What is the difference between a stretch and a release, you ask? Mainly, a stretch has you trying to manually pull a shortened muscle into a longer position, while a release has you put compressive pressure directly into a tight muscle, which can be in either a shortened or lengthened position, with the purpose of interrupting the signal being sent between a mechanism called mechanoreceptors in your muscle, and your brain. It’s complicated, but there is a difference, and in some areas a release is far more beneficial than a stretch can be – like in the glutes!
This release is my favorite – I do it several times a day and recommend it to all of my patients. It can be done with a tennis ball, lacrosse ball, or acupressure ball depending on the level of pressure you can tolerate, and can also be done laying on the floor or standing against a wall, based on your own mobility needs. Accessibility is key for longevity!
GLUTE RELEASE
- Pick a ball, any ball. Tennis balls are great because they have a lot more give to them which means less intense pressure to the muscle, plus they can also be purchased at any dollar store (so the cost is extremely low). A lacrosse ball or accu ball will provide more resistance and can be used if you find the tennis ball just doesn’t reach deep enough into the muscle.
- Lay flat on your back, feet flat on the ground, knees bent.
- Lift your hips and place your ball under one side of you bum. The best part about this release is that you will know when you’ve found where the ball needs to go. It is entirely up to you in how tight the muscle feels, but once you have found a sore spot simply sink down and allow your full weight to compress on the ball.
- Aim to find two or three different spots on each side and hold each one for about 60-90 seconds. You can find spots on the inner edges, near your sacrum (tailbone), or on the outer edge near your TFL (tensor fascia lata, which is like a squishy deck of cards that sits next to your hip bone)

Image by www.barefootphysiotherapy.com.au
o To INCREASE the intensity, bring the ankle of the leg you’re working up onto your opposite as seen in the photo above.
o To DECREASE intensity, you can do this same release by simply standing up against a wall and placing the ball between the wall and your bum, backing into the wall with as much pressure as you can stand to use.
And that’s it, folks! Like I said at the beginning, there are TONS of different stretches, releases, and all around nifty tricks you can use to ease hip tension - these are just my go-to beginner level rehab tips to get you feeling looser in your everyday life with minimal cost or commitment on your part.
If at any time you feel like your pain is beyond that of normal muscle tension please visit a health care professional for further assessment.
FROM THE GYM TO WORK OR OUT ON THE TOWN HAIRSTYLE
Hi TFGG!
My name is Katie and I am a journeyman hairstylist at Grace Hill Salon here in Winnipeg! I have been asked to share with you some cute gym hairstyles and some styles you can wear from the gym to work or out on the town!

This hairstyle tutorial can be found on my instagram! @styledby_katie
First of all, I love incorporating braids or twists into any style! Seriously they are so fun and can make a plain ‘ol style look super fancy.
The first look I love is a Dutch braided top knot. You can either do one braid into a top knot or split the hair in two and do a double. This is perfect for girls with shorter hair like me who can’t get it all up into the perfect pony with no bobby pins. If you sweat a lot and are worried about having the hair on your neck, take a clip with you to the gym and just clip the rest of the hair up! Honestly, who cares what you look like when you’re working out, I’ve done this many times and not once have I cared😂
The first step you’re going to take is to gather the hair you would like in the top knot. Next, split that section in half. Braid each section back, starting at the hairline. Once the braids are complete (braid until you have about 3-4 inches of hair left) grab both pieces and proceed with your technique for your bun! If you check out my Instagram there is a quick tutorial on this look 🙂
The second look is having your hair allll the way up. I love starting a braid at the nape of my head and have it going up into a high bun! This can be a challenging task as you have to flip your head upside down and get your hands just right but consider it part of your stamina training. Once you’ve completed your braid up the back of your head, secure temporarily with a clip until you have the rest of your hair back. Do your bun as per usual and you should have a super cute style to last through your workout and into a night on the town!
If you are heading out right after the gym, refresh with dry shampoo and tame any flyaways with hairspray!

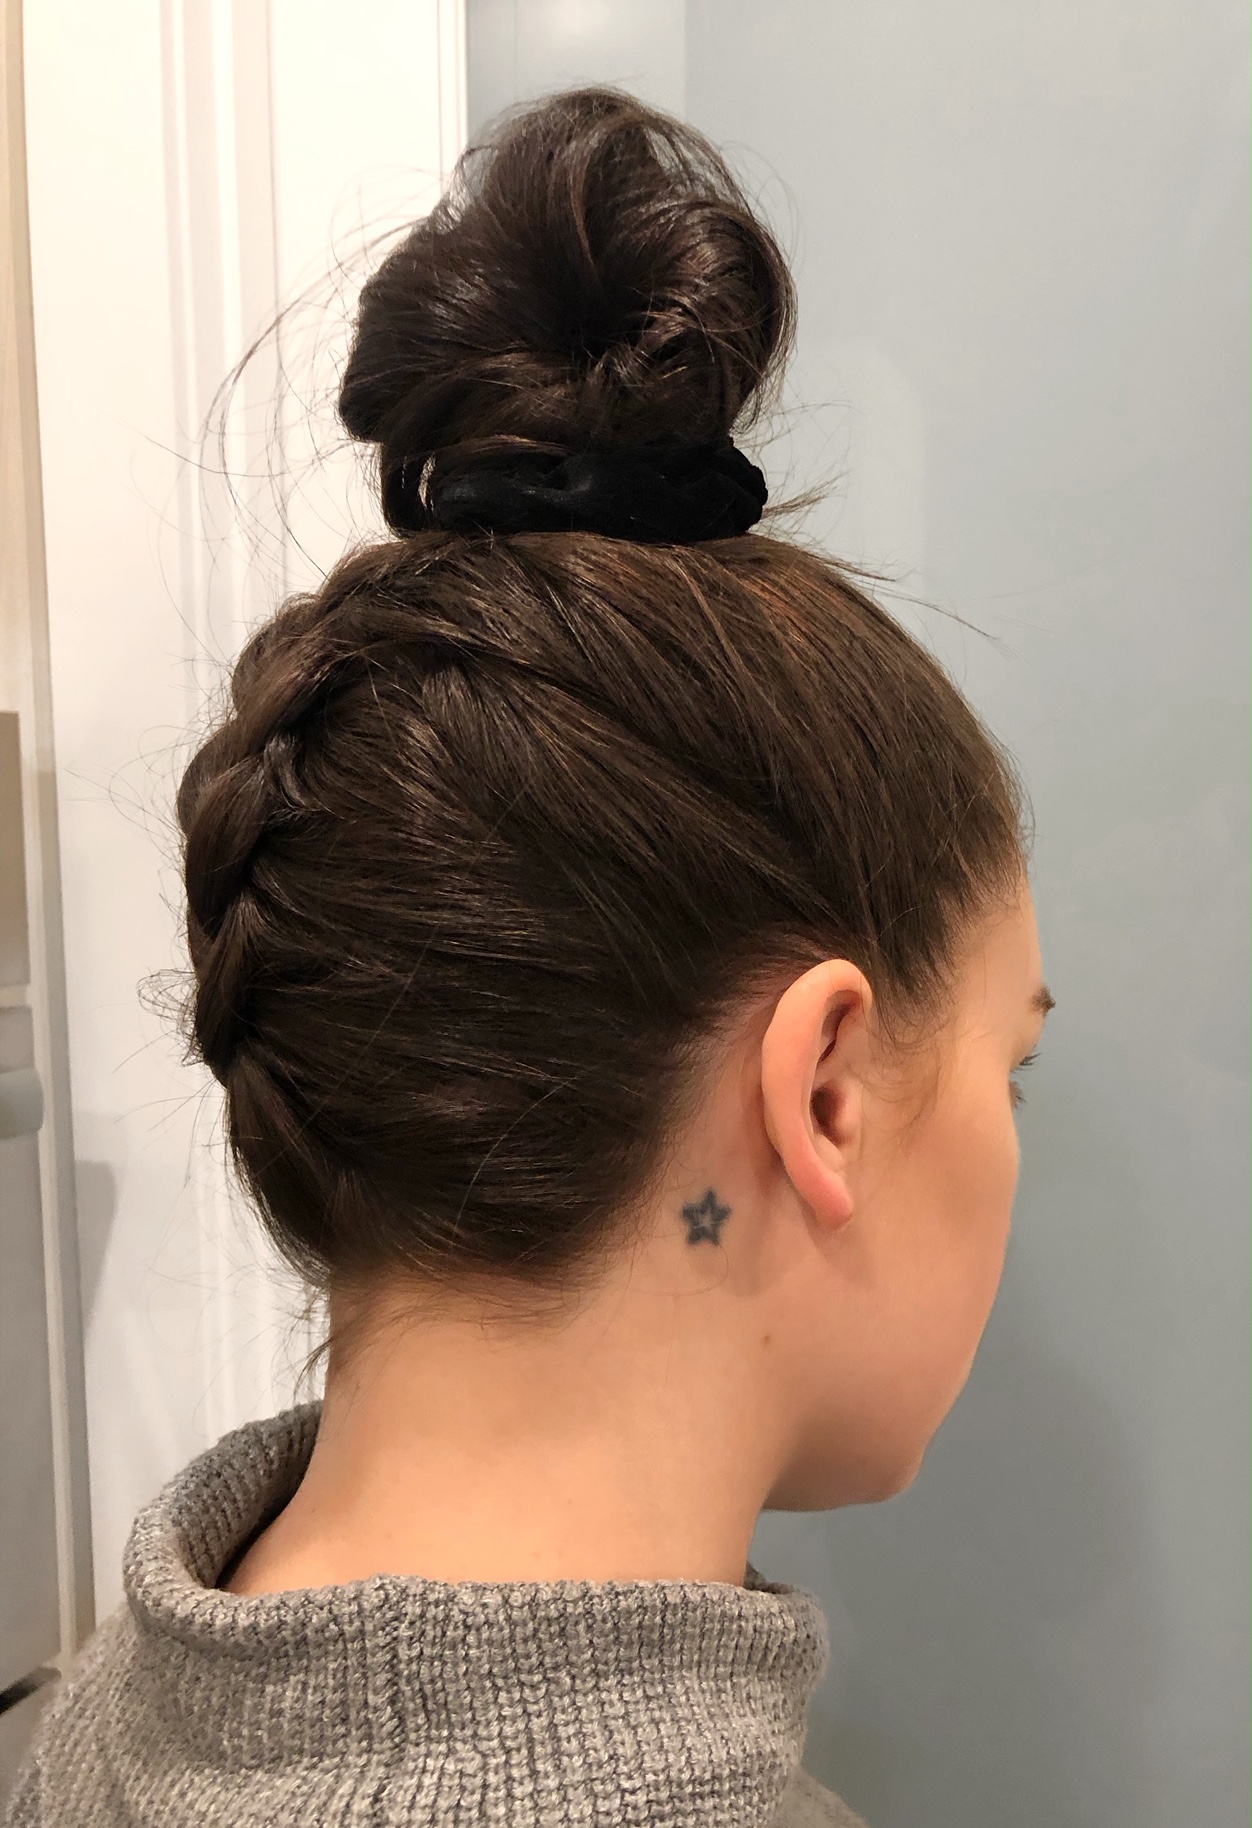
Hope these styles were helpful 💕
Xo Katie
TIPS & TRICKS FOR A HEALTHY BUDGET FRIENDLY VACATION
Hello, all you beautiful humans,

My name is Danica and I grew up here in Winnipeg! For those of you who don’t know me, I’m 20 years old and after high school decided I was gonna go on a trip to Southeast Asia. Well that one trip 2 and a half years ago turned into so much more travelling. I have now traveled through Southeast Asia, Indonesia, Malaysia, Dubai, Philippines, Mexico, Dominican Republic as well as China and I plan on seeing much more of this beautiful world!
When traveling so much and being on a budget it can definitely get tricky to eat healthily and stay on track! So here I am to help you with my tips & tricks on eating healthy while traveling without breaking the bank!
BREAKFAST!!
When it comes to breakfast, this is usually where you can save a lot of money. When booking your hotel, most of the time it will only cost an extra dollar or even nothing at all to have breakfast included in your stay so why not take advantage? Don’t get me wrong, we all love going out to a cute aesthetically pleasing cafes for our almond milk lattes and beautiful avocado toast but, why not stay in and pick the healthier options from our hotel. You know eggs, some toast and fruit will always be available so why not save that $20 you were gonna spend on avocado toast and eat your free eggs provided for you in your hotel!
Oh and let me tell you I've had some AMAZING free omelets!!

FRESH FOOD!!
Eating fresh fruits and vegetables can be so easy and cheap especially when traveling in warmer climate areas! It’s so easy to be out and about and just run into a fast food restaurant or a convenience store to grab a snack but why not find out where the local food market is? There usually is some sort of food market with fresh fruits, vegetables, and local vendors! It’s such an easy way of eating healthy and nutritious foods plus you’re supporting the locals! You can also get some pretty cute insta pics at markets hehe!

DRINK LOTS OF WATER!!
This is such an easy tip but we all need to be reminded to drink water! Especially if you are in a warmer climate and chances are you’re walking around a lot you will need to keep hydrated! If you’re traveling in a country that has drinkable water, bring yourself a refillable bottle and bam there you have it free water! If you’re traveling to a country that does not have potable water obviously this isn’t really an option. Unfortunately, you will have to buy plastic bottles. From experience hotels charge way too much for water bottles, you can get very inexpensive bottles at the convenience stores like 7 eleven. **Buy the bigger bottles, it’s cheaper in the long run and will force you to drink more water!
DO YOUR RESEARCH!
Don’t just eat anywhere, do your research! It can be super simple to find the best places to go. I love using TripAdvisor, you can narrow down your search to what kind of budget you’re on, what kind of food you’re looking for and so on... If you’re in a foreign country, you don’t want to be eating just anywhere. Find someplace that is cheap and has good reviews! The last thing you want is getting food poisoning, which unfortunately has happened to me a few times and it’s not fun and you definitely want to avoid that at all costs!!!
TRAVELING TO ASIAN COUNTRIES
This tip is more focused on traveling Asian countries. The nice thing about these countries is that their local dishes are cheap and healthy. Usually, these dishes consist of rice, vegetables, your choice of protein and sometimes an egg! These dishes are always the cheapest option. I found myself eating lots of rice and vegetables on my trips and I had no complaints!!

@daniicanicole_
At the end of the day, you are on a trip and a trip is supposed to be fun!! You don’t want to stress too much about what you’re eating or how to save money doing it. So hopefully this list of my tips and tricks to staying healthy while traveling for cheap helps you all have an easier and healthier vacation!! If you are reading this because you are away on a trip or planning a trip, lucky you!
Have the most amazing, stress-free and healthy time. Take it all in, collect beautiful moments, your money will return but your time won’t!
Live a little,
Danica

GOOD TO GLOW MAKE UP
‘GOOD TO GLOW MAKE UP’
Lets talk about GLOWY SKIN... Creating a make up look with a glowy and dewy base is the
quickest way to refresh a tired face. Lets keep it simple...
Achieving a healthy glow is best done on skin that has been sufficiently prepped! What do I mean by ‘prepped’? I mean preparing your skin by getting it in the optimal condition for make up to be applied. Here are a few steps you can take before your make up application to get your face ready to glow!

1) Apply a face mask the night prior to your application
2) Gently Wash and Exfoliate your face and neck
3) Apply your favourite serum or hydrating booster, or daily moisturizer
4) Remember your eye cream ! - Apply in an upward motion
5) Prep your lips with a hyrating lip conditioner or balm
6) Allow product to sink into the skin and follow with a hydrating primer
Hey Gang !
Once your skin has been prepped apply a liquid highlighter or soft liquid illuminator to the high points of the face. I often tend to blend this out using my fingertips as it melts nicely into the skin. Your foundation will be applied next , this will give a soft glow coming from within.
Choose a foundation that offers a slightly radiant finish. Avoid using a foundation that is to thick or matte as this can sometimes make the skin appear dull or dry, especially in the winter months...
Subtly highlight the face using a liquid based concealer, underneath the eyes and through the center of your face. Choose a shade that is 1-2 shades lighter than your base foundation colour. Blend well using a beauty blender or the tips of your fingers to warm the area underneath the eye. Set underneath the eye with a slightly radiant powder to maintain a glowy not cakey finish.
Warm the face using your favourite bronzer. Softly define the cheekbones while also applying product to all places on the face that would naturally be hit by the sun :)
Add a sweep of Blush in your favourite warm tone. I often select a blush that has hints of gold to it... I find these shades add a nicely bronzed affect. Blush is my favourite part of the base application as it quickly wakes up the skin and gives you a youthful boost!
To finish, go in with your favourite powder highlighter and dust the top of your cheek bones, bridge of the nose, cupids bow, and brow bone. Layering your highlight where you had first placed your liquid illuminator will intensify your glow and leave your skin beaming ! Set your make up with a dewy setting spray for a fresh finish ... and you are good to GLOW x

@baileydelbigio

4 Steps to Master Your Hunger
Hey ladies! Thanks for joining in today! I wanted to share some knowledge with you girls about something that I get asked aaallll the time: WHEN and HOW MUCH someone should be eating – and the truth is, it's different for everyone! I know that's not the sexy answer you're looking for, but don't worry! I have 4 steps for you to follow to master your hunger and figure it out.

@athletic.nutritionist - Bri Collette, RD.
I want to start by describing how amazing the human body is. Did you know that our bodies are our BEST measure of how much food we should eat and when we should eat it? Yup, that's right! We have internal cues that tell us exactly that – food timing and quantity.
There is a lot of research that suggests that kids are SO good at knowing when and how much to eat – because they listen to their bodies!! As we grow up, we start to ignore these signals for many reasons – sometimes it's our parents tell us how much to eat, and sometimes it's our environment that tells us we need to eat at 8:00 a.m., noon and 5:00 p.m. And lastly… there's social media that tells us silly things like you can't eat past 6:00 p.m. All of which makes us lose the connection to our internal hunger and fullness cues!
If you think about it, you may have been listening to your hunger cues when you were 3 or 4, but when's the last time you truly thought about your hunger? Tuned in to what your body is saying? It's maybe been months or even years for some of you! And that's why I wanted to chat about the 4 steps you can take to master your hunger!
Throughout this post, you'll see journal exercises that will help you to navigate each step! These are meant to be reflections because we typically don't sit around and think too much about what our stomach is saying to us! Enjoy!
Step 1 – Identify YOUR Hunger Cues
The first step in mastering your hunger is to really figure out what hunger signals are specific to YOU. That's right – they might not all be the same from one person to the next, so hear me out… For example, you might be someone who hears a growl or gurgle sound and that's your clue for knowing your body is asking for food. Someone else might be feeling a little pain or stitch in their stomach telling them that they're hungry, but they don't hear a thing! Some people might actually have both!
These are both physical cues for hunger, but others exist as well!
Other girls will experience hunger in a psychological way. A great case is the 3:00 p.m. wall! Energy is LOW and suddenly, you're not feeling like working and you get distracted super easily – sound familiar? OR it can also be irritability. If you haven't eaten for a few hours and everyone and their dog is getting on your nerves, that might be YOUR cue that you're hungry.
Journal Exercise: Reflect on your hunger cues - What clue is my body giving me when I am hungry? Is it one thing or a combination of things? Physical only or psychological as well?
Step 2 – Identify the TYPE of Hunger
The next part of the puzzle is figuring out the type of hunger you're having once you've clued in that you ARE hungry.
Hunger type has 3 categories:
Physical
Mouth
Emotional
Physical hunger is the classic type of hunger – the physiological response to needing more food! This one is bound to happen if you haven't eaten in a few hours. This is when your body is asking for energy, sustenance and you need to eat!
Mouth hunger is all about texture – this is the type of hunger where you're needing something smooth, crunchy, melty, cold, hot, etc. Often times we have a desire for a certain texture and it's really important to clue into that too – this helps us determine what KIND of food our body is wanting. In physical hunger, you might not really care what texture or temperature of the food you're getting but with mouth hunger – this makes a difference for the satisfaction of your meal!
Lastly but not least is Emotional hunger – and I think you know where I'm going with this one. Emotional hunger is when we want to eat for pleasure, sadness, reward, etc. Emotional hunger can happen for both positive and negative emotions we're experiencing – and that's okay! Identifying that you are having emotional hunger is part of the process in accepting that emotional eating is okay and part of life!
A journal Exercise specific to emotional hunger: Will food satisfy your hunger? Is there another way you can satisfy that emotion better?
Stress – having a bath, meditating, etc.
Reward – go on an outing, go shopping, etc.
Boredom – Play a game, journal, etc.
Journal Exercise: One day this week when you are able to prepare a meal and eat it directly after – think about what kind of hunger you're experiencing and write it down. Example: If you think it's mouth hunger, then identify what kind – see if that affects the food you choose to prepare! Write down the type of hunger you had, the food you decided to have and the satisfaction it brought you (if you listened to it or not!). How did that make you feel? Explore it!!
Step 3 – Identify the LEVEL of Hunger (and fullness)
Now we've talked about the cues and the types, but what about the INTENSITY!? That's where the Hunger Scale comes in. The Hunger Scale is something you can try to identify at any point in your journey to master hunger. This scale helps us to determine how hungry we actually are and also how full we actually are. This tool is best used AT meal time and throughout. Here are some tips for using the Hunger Scale appropriately:
1. Try to identify where you are on this scale. Ideally, you will be a 3-4 before you eat! This can be done while preparing food or just before having it.
2. Again, try to ask yourself this at some point towards the end of your meal – where am I on the scale?
3. Once you have finished eating – see again where you fall after 10 minutes. Here, you'll want to fall between a 6-7 most often!
4. Troubleshooting: If you can't identify hunger or fullness then consider your routine. Are you skipping meals, eating regularly or snacking/grazing all day? Look at this pattern to give you some more insight!
Journal Exercise: I suggest trying step 1 before this exercise! Try journaling for 3 days in a row and pick one meal where you will try and use the Hunger Scale as described above. Write down your thoughts – where you're at, where you end up, how do you feel? What came up during this exercise? Do you have any conclusions or changes to make? This is very individual but will be helpful to bring awareness to your meal!
Step 4 – Anticipate your Hunger.
This is the last step and very specific to active women just like you! At this point, you're likely clueing into your hunger and thinking more mindfully about your food and that's awesome! BUT I want to let you know that eating more mindfully also takes into consideration anticipation!
By working on steps 1-3, you will likely figure out how you will feel in a few hours – and this is KEY. Because even though you might not feel very hungry that moment, you also know your workout is coming up and you might be hungry during it!
What you do here is very straightforward – if you anticipate hunger, then have a snack! You can also start to anticipate the INTENSITY of hunger like in step 3. This will help dictate how big of a snack you might need. Experiment with hard foods for higher intensities while you might find a smoothie or chocolate milk is a better option for something lighter and closer to exercise. Very individual here – but practice with what will make you feel the most energized and less hangry during your workout!
Journal Exercise: Pick a day where you have a workout planned and try to anticipate your hunger. Maybe you pack a snack and decide whether you need it or not. Maybe you anticipate needing a smoothie before you a.m. workout – or not – the night before. This one is individual with your schedule but try to clue into your hunger and energy needs for your workout beforehand! What sits well in your stomach? What makes you feel more energized? Was the amount too much or too little? Get the details!!
Alright, ladies, that's the four steps to mastering your hunger!! I know this is a lot of information and might seem pretty intimidating, but I promise this will help you in the long-run. Truly knowing your hunger and fullness cues will help you regardless of your activity level and at every stage of life! I hope you enjoy these tips and exercises to get more in-tune with your body! <3


Becoming the BOSS of your money

Hands up if these feelings describe your most recent shopping experience:
Swipe, swipe, swipe… joy!…… followed by.. panic, worry, fear.
My name is Lyndsay and I know this feeling all too well. The joy and excitement of buying new things, immediately followed by the feeling of dread from somewhere deep inside whispering ‘you know you have debt and you can't afford that'. If you are debt free, money master this post likely isn't for you, however, keep reading for basic budgeting tips! This post is primarily for the girls who work their tails off to earn their money, but never seem to get to keep it; a cycle of living pay-cheque-to-pay-cheque.
I'm here to tell you, you do not have to live this way! And what gives me the right to deliver this message? Well, I don't have degrees in finance, but I have always had an intense interest in money and how it works, and I have also had the personal experience of digging myself out from under a very large pile of financial shit (I mean real shit, like rental properties with mortgages included). Coming out the other side I discovered the freedom, joy, and peace that comes when you pay off debts and afford your lifestyle. I am not exaggerating when I say this is life-changing and motivated me to share with anyone I can.
Whether you have credit card balances, car loans, student loans, or some variation of all and more, you can and should put in a little sweat and tears to get out of it. It will be worth it! I bet you have dreams that financial stress is keeping you from. Imagine if you didn't need that crappy 8-5 job to pay the bills and instead had the resources to quit and build something of your own, or the resources to travel anywhere or buy anything you wanted.
This isn't about being greedy and making your world revolve around money, this is about living a life you love with less stress and worry. Money is a tool, ladies, a fantastic tool to help you in your pursuit of the life of your dreams, or in pursuit of the Gucci belt of your dreams; wherever your aiming.
So, sounds good, but where do I start? Here are the three things to do right now to help you get control of your situation and start to tackle debt one step at a time. It is important to go through the steps in order to set the foundation you need to build upon for financial success in the future. Don't just pick a credit card from your wallet and profess to pay it off in 3 months- walk through the steps with me and together we will make a plan that works.
Step 1: Lay it out
The average person has no idea how much debt they actually have; they may know the payments they make monthly, but they don't know what they actually owe. The first step in tackling the debt is to look at it, pull back the curtain and lay it all out. Take out a pen and write down the balances of all the debts you have in order from the smallest balance owed to largest, except your mortgage (where applicable). You may need to do some digging to get the actual numbers, don't just guess! Next, to each balance write the interest rate and the minimum monthly payment. It may look something like this:
BMO Mastercard- $1420 @ 18%, $18.00/month minimum
Visa Card- $3200 @ 20%, $34.00/month minimum
Car Loan- $12,340 @ 5%, $342.00/month minimum
Student Loan- $23,560 @2.75%, $232.00/month minimum
Make sure to ignore the interest rate and monthly payment when prioritizing the list. The debt with the smallest balance is debt number 1, the second smallest balance is number 2, etc. The reason we do it this way is that we are going to throw everything we have into tackling one debt at a time. Starting small means we see small wins early, resulting in gained momentum and a higher chance of success.
Step 2: Budget & Track
The second step is to make a basic budget. A budget is like a set of instructions for your money, you are telling it where it will be spent before you even get your pay cheque. This is the part most of us struggle with because it can be hard to build a realistic budget that we can actually stick to. The rule here is to be realistic but be smart. You have to know that if you have debt you are not yet on track for wealth building (sorry, true fact) so having $450 in your clothing budget when you have credit card debt- that is likely, not smart.
You can make your budget in excel or you can write it down on a napkin- doesn't matter to me!
This is a simple process guys, just some basic adding and subtracting. You can make a budget for every payday or you can do one for the whole month; whatever works best for you. I, personally, have better success with budgeting for every pay cheque.
How to make a budget that works:
Write down your income- if it is variable, make an educated assumption and adjust.
List your expenses for that budget period- this includes a small amount to savings and the minimum monthly payments to debt (ONLY the minimum, never budget more than the minimum to each debt, including the minimum payment on credit cards- you will see why below),
Tip: Your budget will and should change each time you make it. For example, add in money for a birthday gift and then take it out next time, add in your cell-phone bill in one pay cheque and remove it the next time; do this every time you make the budget so that it matches what is actually happening in your life for that period. Now add up all of your expenses.
Zero your budget- your budget should equal $0 when you minus total expenses from total income; in other words, your expenses should match your income.
If you have money left over, add it to the payment you are making on your smallest debt. For example, increase the minimum payment you are making to your smallest credit card by the amount left in your budget, this will zero it.
If you have a negative dollar amount left then you need to take things out of your budget because, I am sorry friend, but you are living outside of your means and something has to go. This can be where things get tough because it means sacrificing. Keep in mind that you didn't get in this situation because you were living within your means, right? It is time to adjust for the short term.
Tip: The goal here is to squeeze your budget so that you have extra money to pay onto your smallest debt, this is how you will reduce your debt load. You will continue to pay only the minimum payments on all debts except the smallest one, this one you are attacking with every extra dollar you have. Once that debt is paid off, debt 2 becomes 1 and you attack it with every extra dollar you have. This is called the ‘debt snowball' because the pile of money you are throwing at the top debt gets bigger as you free up more and more money with each debt you pay off.
Step 3: Track and Adjust
Now you have to track what you actually spend in each of the categories you set up in your budget. This may seem like a lot of work- I get it- but you can't plan it and then not check if you stuck to it. At the end of the bi-week/month you will be able to see how much money you are actually spending and on what and then adjust your spending habits and your budget as needed. This is the KEY! You might be surprised to see just where all of your money is going. Keep in mind that you don't have to do this forever, but you need to do it to get the information to help you see where all the $$ is going.
Tip: There are a ton of budgeting apps out there like Mint, Every Dollar, and many others. These give you categories and can even sync with your bank accounts! Personally, I use a very simple excel spreadsheet for my budget because I find it easier to be in control of the whole process, but a lot of people prefer apps, whatever works for you!
I will close with saying, please be easy on yourself. You will not always stick to your budget, but it is the effort and awareness that counts. Once you start to control your money instead of letting it control you, you will start to see more of it show up, more of it stays with you, and you will become better and better at being a boss of it and understanding the power of the tool you have. Don't tell yourself that you will start when you get a raise when you get out of school when you ____ (fill in the blank). Start now! If you don't start to build these habits and practices now with the income you currently have, you won't do it later either. Getting a raise doesn't change our spending habits, we just spend more. If you start now, then when more money starts to show up for you, you will know what to do.
Make 2019 the year you change your financial story and work towards the financial freedom you so deserve. Money situations are very specific so please, if you have questions about ANYTHING money related don't hesitate to DM me via Instagram @lyndsaygillon. Cheers to a happy and prosperous 2019!
Hidden Gems with The Tasty Tidbits

Hey wonderful people. My name is Alex Mandaliti, and I am obsessed with food. I am so obsessed that if I could eat out for every meal in the day… I would. I am the writer of a blog and Instagram page called The Tasty Tidbits. My page is all about sharing delicious places to eat and my favourite things about them. One of my absolute favourite things about Winnipeg is our long list of little hidden gem restaurants. Hidden gems are the kind of restaurants that may not be the prettiest or have the best service, but they definitely have the best food and prices. Winnipeg is bursting with these incredible underrated places. I’m going to share with you my top 5 hidden gems!
#5 Super Deluxe: If you’re from the Osborne Village area then you already know about this killer pizza place. The baby to the incredible Vera Pizza. This is currently my favourite pizza in Winnipeg. Very classic traditional Napolitano style pizza. Simple with fresh ingredients. This is the kind of pizza you have to pick up and fold (like the real Italians do). This style of pizza often has a thin crust, lots of sauce and minimal toppings that are bursting with flavour. Because of the loads of sauce it has that crunchy border and soggy/wet middle. The way Napolitano’s have been making it for years. With green checkered floors and old school booths you’ll feel transported right out of the village. A simple menu with under a dozen menu items, you’ll be pleasantly surprised. Make sure to order the Kale Ranch Salad and the Caramelized Onion & Pancetta Pizza. Also check out their Instagram page for their ever changing specials. $5 Slushies on Saturdays which are really an Aperol Spritz in Slushie form, to their $1 Wine Corkage on Sunday’s.


#4 BMC Market: A long time classic that surprisingly isn’t as well known as it should be. FIVE DOLLAR TACOS. Yup FIVE DOLLAR TACOS. This traditional taqueria is as close to Mexico as we are going to get here. This is the kind of place you go when you want to have a delicious tasty meal and not break the bank. You can get 3 tacos for 5 dollars, and add a drink for $2.25. I recently had lunch here with a friend. We ordered 6 tacos to share, a drink, and chips with avocado dip and our bill was $16.00. Fill up on authentic treats, while enjoying the little Mexican escape as you step inside this mom and pop style shop.

#3 Kum Koon Garden: Are you ready for this one? This has been my go to Sunday brunch spot for as long as I can remember. If you love Dim Sum then you need to be here. This MASSIVE restaurant often has waits on Sunday’s to get in.. but don't worry it goes by quick. This is the kind of Dim Sum where you will feast until you have to be rolled out of the restaurant.. it’s that good. They have endless carts that come around with every dish you can imagine. They have all your classics like Shrimp Dumplings, Lo Mai Gai (sticky rice in lotus leafs), Steamed Pork Buns, Shrimp Noodle Rolls, Fried Sesame Balls.. And everything else you could hope for. If you are a Dim Sum Virgin then this is the place to go. Start with some of the items I listed or just pick whatever looks good when the carts go by. If you are a Dim Sum lover then i’ll see you next Sunday!
#2 Boun’s Asian Cuisine: Okay.. Now.. This one I was hesitant to share because, well, it's one of my best kept food secrets. Boun’s is the ultimate hidden gem of Thai & Laotian food. Winnipeg is filled with incredible Thai, but there is something about Boun’s that keeps me and my family coming back for over a decade! My favourite thing about Boun’s is his story. Originally he ran Vientiane a very well known Thai & Laotian spot on Marion. I remember going here as a kid with my family. Boun always served us, and remembered my parents by name. Eventually Boun sold Vientiane… and just a while later opened up Boun’s Asian Cuisine… 5 doors down.. In the same strip mall. WHY? I have absolutely no idea.. But either way I was happy to have Boun’s cooking back in my life. Boun’s is this total hole in the wall style family restaurant. This is the type of place you go and wait forever to be served. Do not expect quality service. This is not that kind of place. But the minute that food hits the table it all makes sense. This is the kind of place you go knowing the food is worth the wait. I can promise you that. Try the Lettuce wraps, Tom Yum Soup, Green Curry soup with rice, Pad Thai and Cashew Nut Veggies. All the classic Thai dishes but there's just something different here. It’s out of this world.


#1 Deen’s Caribbean: Alright.. Here is my favourite hidden gem of all. Deen’s is another one of those spots I’ve been going to with my family for over a decade. Deen’s is a tiny little Caribbean spot that has been around for YEARS. Deen’s is the kind of place you go for a quick lunch or hang around on the outdoor patio for live music in the summer. Deen’s is serving up the most badass Rotis and Doubles that I personally have ever had. I always start with an order of Doubles (Fritters topped with curry chickpeas) and follow it with a chicken and shrimp roti. Deen’s is the kind of family restaurant that has a fish tank, massive mural on the wall and floral chairs. It's the kind of spot that you feel like you are being hosted in their home and they are so happy to have you. They really treat you like family and get pleasure out of feeding you. Deen’s food is simple and packed with flavour. You’ll leave full for under $15.00! Does it get better than that??

Alright, now get out there and start eating. I’d love to hear what you think about these spots. Comment or message me on Instagram @Thetastytidbits. Do you have any favourite hidden gems? Let me know.
Happy eating!
Alex Mandaliti
The Tasty Tidbits